AWS Security Blog
Integrate CloudHSM PKCS #11 Library 5.0 with serverless workloads
Amazon Web Services (AWS) recently released PCKS #11 Library version 5.0 for AWS CloudHSM. This blog post describes the changes implemented in the new library. We also cover a simple encryption example with the Advanced Encryption Standard (AES) algorithm in Galois/Counter Mode (GCM), dockerized, running on AWS Fargate.
The primary change from the previous SDK 3.x version is that there is no longer a separate client daemon. Functionality that was previously provided by the client daemon, such as load balancing or high availability, is now fully built into the PKCS #11 Library.
CloudHSM Management Utility (CMU) is used to manage users in the hardware security module (HSM). In the past, CMU was part of the client package, but because the new PKCS #11 Library doesn’t require the client package, we’ve extracted CMU out to its own package.
This change brings advantages for our customers who are running serverless workloads with either AWS Lambda functions or AWS Fargate for containers. Previously, workarounds were required in order to communicate with the CloudHSM cluster. This type of workaround is described in the blog post How to run AWS CloudHSM workloads on AWS Lambda.
Solution overview
This solution shows you how to create a proof-of-concept sample Docker container that uses the new PKCS #11 5.0 library to encrypt and decrypt a string by using AES GCM. This solution uses CloudHSM to generate an AES key, and then it uses the key to encrypt and decrypt data from the example code, which you can download from our GitHub repository. The CloudHSM client is no longer needed as in previous implementations.
The following diagram illustrates an Amazon Elastic Container Service (Amazon ECS) Fargate task running an application that uses the PKCS #11 5.0 Library in a serverless environment. The application in question communicates through an elastic network interface to the CloudHSM cluster directly, without relying on an additional CloudHSM client. The application’s image is stored on Amazon Elastic Container Registry (Amazon ECR) and secrets are injected from AWS Secrets Manager.
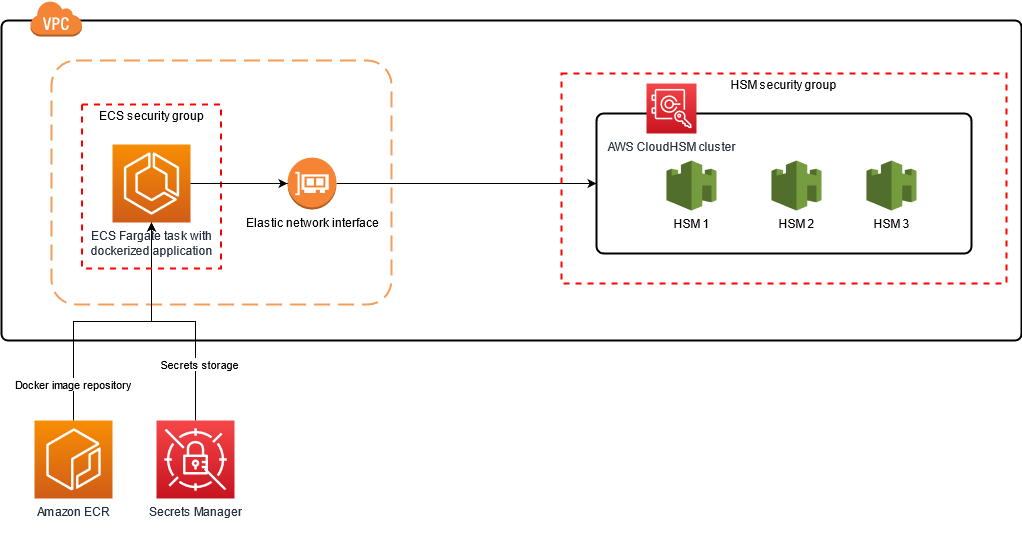
Figure 1: Solution architecture
Prerequisites
To implement this solution, we strongly recommend that you have basic knowledge of the following:
- Linux
- CloudHSM
- Docker
- Amazon Elastic Container Registry (Amazon ECR)/Amazon Elastic Container Service (Amazon ECS)
Here’s what you will need to set up in order to implement the solution:
- An active CloudHSM cluster with at least two active HSMs. You can create and initialize a CloudHSM cluster by following these steps from the CloudHSM User Guide. (Note that for any production cluster, you should have at least two active HSMs spread across Availability Zones.)
- A CloudHSM crypto user (CU) account created on your HSM. You can create a CU by following these steps from the CloudHSM User Guide.
- An Amazon ECS cluster in the same virtual private cloud (VPC) as your ClusterHSM.
- An Amazon ECR repository for your docker images. You can create a repository by following these steps from the Amazon ECR User Guide.
- A CloudHSM security group that allows the ECS task’s security group access on port 2223.
Implementation
In this section, you’ll see how to check out the example source code, build your application image with the CloudHSM library, and deploy the image to AWS Fargate.
Step 1: Prepare the source code
Use the following command to check the code out from our GitHub repository.
Create a new project folder to which you will transfer example code.
Remove the unnecessary examples and clean up their references in the CMakeLists.txt file (optional).
Step 2: Install the customer CA certificate
Use the following command to copy the customerCA certificate, customerCA.crt, into a different folder; you can give the folder a name like pkcs11-5.0-sample/crt. (customerCA.crt is the file that was created during cluster setup.)
Step 3: Build a docker image
The docker image will contain the application, as well as the CloudHSM PKCS library and all its dependencies. Here’s an example dockerfile:
Now you can try building the image by using the following command. Make sure to replace <YOUR_CLOUDHSM_CLUSTER_IP> with the CloudHSM cluster IP address.
After the image is built, it’s ready to be uploaded to the Amazon ECR – docker image repository.
Step 4: Set up secrets
In this step, you use AWS Secrets Manager to create a secret to store your CU user name and password. This step requires that you install and configure the AWS Command Line Interface (AWS CLI) on a machine.
Run the following command to create a secret with the HSM_USER and HSM_PASSWORD names that contain your CU user name and password (prerequisite 2). Make sure to replace <user> and <password> with your actual CU user name and password.
Make sure that the task execution role has the following permissions policy on the secrets that were just created. An example policy for executionRoleArn is as follows.
Step 5: Upload and run the docker image on Fargate
To make the image available on Amazon ECR, you can copy the push commands from the AWS Management Console. (To do so, sign in to the Console, choose Amazon Container Services, and then choose Repositories. Choose the name of your repository, and then choose View push commands.)
The following script authenticates your docker client, builds the image, and pushes it to the ECR repository.
Now your image is ready to be used. To run it in the Amazon ECS Fargate cluster, you need to create a task definition that describes how your image is run, what environment variables and secrets it has, and what resources it needs.
To create a task definition for the current solution, specify the following information in the ECS console:
- Image: Point to your image in Amazon ECR with the latest uploaded tag
- Task / execution role ARN: Make sure this role has permissions to access credentials that are stored in Secrets Manager
- CPU and memory: You can use minimal values should for this container
- Log group: Where the output logs will be forwarded
- Environment variables for HSM_USER and HSM_PASSWORD that are retrieved from Secrets Manager
To set the environment variables for HSM cluster credentials, you can use the following JSON block for the task definition.
Now that the task definition exists, you can start this task in the ECS cluster. It can run either in a service or as an individual task. You can start it as an individual task for testing purposes.
To start the task as an individual task
- In the ECS console, navigate to the cluster, choose Tasks, and then choose Run New Task.
- For Launch type, choose Fargate. For Task Definition, choose the task definition that you created in the previous step.

Figure 2: Fargate launch configuration
- Under VPC and security groups, choose your VPC and a subnet. Then choose a security group that has access to the CloudHSM cluster.

Figure 3: Fargate security and network configuration
- Choose Run Task.
After you choose Run Task, Amazon ECS pulls the container from Amazon ECR and runs it on the Fargate serverless platform. You can check Amazon CloudWatch Logs to see the output. The output should be similar to that shown in Figure 4.
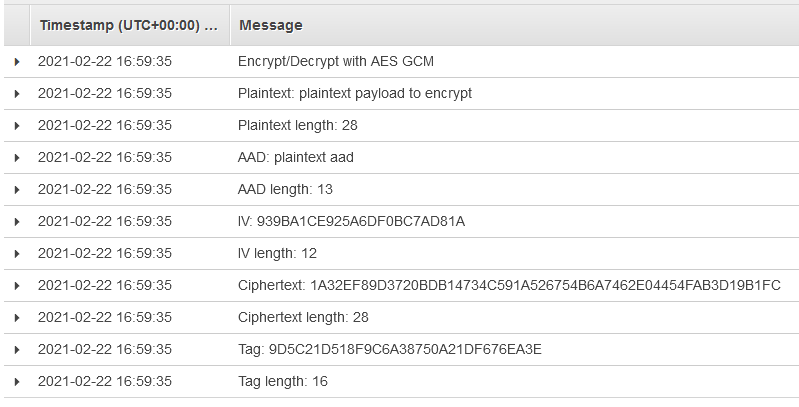
Figure 4: CloudWatch log output from our demo application
Conclusion
This solution demonstrates how to run CloudHSM workloads on AWS Fargate. This approach not only leverages the flexibility of serverless computing, but also helps you meet security and compliance requirements by performing cryptographic tasks such as encryption and decryption operations. This solution also makes it possible for you to integrate other AWS services without the need to run and maintain the CloudHSM client on separate ECS instances.
If you have feedback about this blog post, submit comments in the Comments section below. If you have questions about this blog post, start a new thread on the AWS CloudHSM forum or contact AWS Support.
Want more AWS Security how-to content, news, and feature announcements? Follow us on Twitter.